Post by Blaze on Dec 28, 2009 16:10:28 GMT -5
Well no one has done a review for a HMM on here yet, so here it goes! This is a review for the first HMM, the Shield Liger, which is basically identical to the HMM Blade Liger's build. Wasn't all too into the HMM Shield Liger, but I decided to get one
Intro
First off I'll say that HMMs are not friendly to beginners in model building and requires a lot of patience. There are a lot of small pieces that easily break or get lost easily. Work on something flat and a solid color, like a card table or something, so everything will be in one spot. Good luck if you drop a piece on carpet. Another major point is to be very careful cutting out the parts. I've found side cutter pliers to be the most effective over scissors or razors. They don't put the strain on the pieces like scissors do and it won't take forever/cut yourself like with the razors. There are a few spots where you might want to super glue to hold it together better too.
So you opened the box...
after admiring the awesome box art, and was greeted with about 33 frames of parts, some springs, agobstopper zoid core, instruction manual, and a sticker sheet. OH BOY!
The manual is split into different sections consisting of the building guide, illustrations/concept art, a color guide, some pretty pictures, and a back story in japanese text that I do not understand (Well ok I understand ゾイド and that's the extent of it). Unlike the regular zoid model manuals, these are printed on regular laser paper with a semi-gloss. Why is this good? Can print nicely in color and prints small detail well.
Naturally my favorite part is the highly detailed concept art (tee-hee)
Let's get building!
The first thing you get to build is the head. Like all the building parts, it helps to thoroughly look over the step you're on first and build it piece by piece rather than cutting out all the pieces you need for that step first. With the head it's not so bad. Just watch out for the teeth cuz they're really... er, pointy. Make sure to do the steps in the thought bubbles first.
Next you move onto the "bust" aka the front end of the torso. Once again nothing too confusing. The thing to watch out here is when you're cutting out the gold pieces. Don't cut the end with the thin hydraulic piece, instead cut the thicker end out first then gently twist out the other end. The thin side is extremely fragile and can't stand the strain of cutting (esp with scissors). The tubing/wire thing that goes around where the back gun is mounted seems to like to pop off so super glue might be need there.
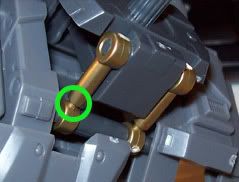 Fragile thin piece
After the bust comes the waist with some more delicate gold/silver pieces. The part where you have to put on the missile pod arms is a bit tricky. I found it easier to put one of the side parts on first after building the middle section and then sliding the gold pieces into the slider part. Then put the the other end piece on. *trying to pull him apart to take pics to illustrate* Now why don't these things come apart when you want them to!?!

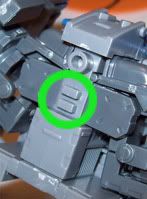
Finally you're on to build the final part of the body, the butt. The things to note here are to be careful when you put together the pieces that the legs attach to. It's marked by a "!" and warns you to pay attention to which is upside. This is important because if you put it on upside down, it won't be able to turn. The other thing to mention is a part that might be in need of some super glue. The piece I took a pic of likes to fall off all the time. It's not apparent until you attach the legs and the added weight makes the whole butt fall off XD;
 Glue area
Once all 3 torso pieces are made the manual tells you to put them together and goes on to build the chest mounted gun and the tail on the same page. Nothing difficult here but just watch which way you put the hoses in on the chest gun.
Next you build the 4 paws. Pay close attention to the angle the rubbery M1 pieces point. Although you can mess around with them and get a Liger Zero claws fanned out / claws all together effect.
And now comes the part where there need to be more steps, the dreaded legs. Seriously. Way to many freakin arrows and pieces for one step. Not to mention anyone with bad eye sight would insta-fail. Yeah I danno what to even say with this part other then look it over a million times before you cut/built anything. The hind legs directions are just as bad. Have fun with that. Oh and those plates that go on top of the paws can be a pain. If you don't put them on perfectly they'll just pop off. If you can't get it just super glue the buggers down.
If you manage all of that, the final step is to put all the pieces together! (Unless you're like me and puts the pieces on once you finish them)
CONGRATULATIONS! You have justeasily built a HMM Shield Liger!
My final thoughts
I have to say at first I wasn't interested in the HMM Shieldy at all, but I think he looks a lot better in person. I can't believe I'm saying this, but I actually like the colors. *GASP!* I didn't have any trouble what so ever building this guy, but of course he's my 4th HMM and after building the Blady (and rebuilding the Blady after painting him) I'm pretty used to building these now. I personally love the HMM line. Probably because I'm heavily into detail and enjoy the more extensive build. The HMMs are also more friendly to me in my incessant need to custom paint models. All the pieces are separate so I don't have to go through all the fuss taping off stuff.
Design gripes/likes:
Heh, well now... I guess I'll start with the head. I still overall hate the head. It's too narrow and totally lost the fluffy-ness that I love in the original Shieldy has in his head. I don't like the nose piece and the first thing I'm modifying is his horrid Aero Liger teeth. But not all is bad about the head. I really like how the side parts of his mane can fold out and I like the canopy design. The only other gripe I have is the missile pods. If you fold them down, they totally don't come out enough and he would always end up shooting himself. I'm thinking about making a swivel part so the pods can face outward instead of aiming straight into his leg.
Overall verdict: Overall I'll go for a regular Shieldy any day over the HMM, but I think it would be interesting to see what the regular Shieldy's head would like on the HMM since it's the only thing that bugs me.


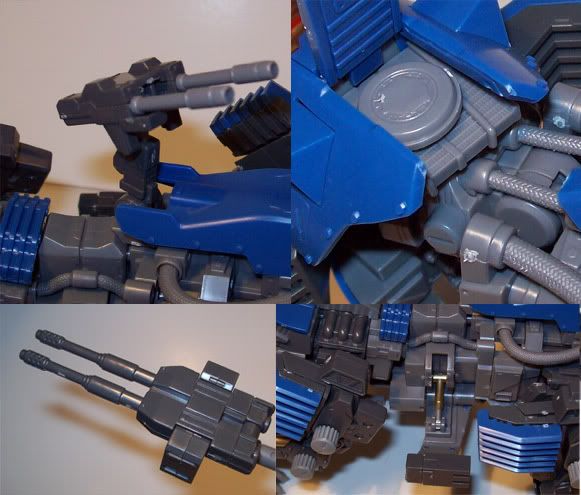
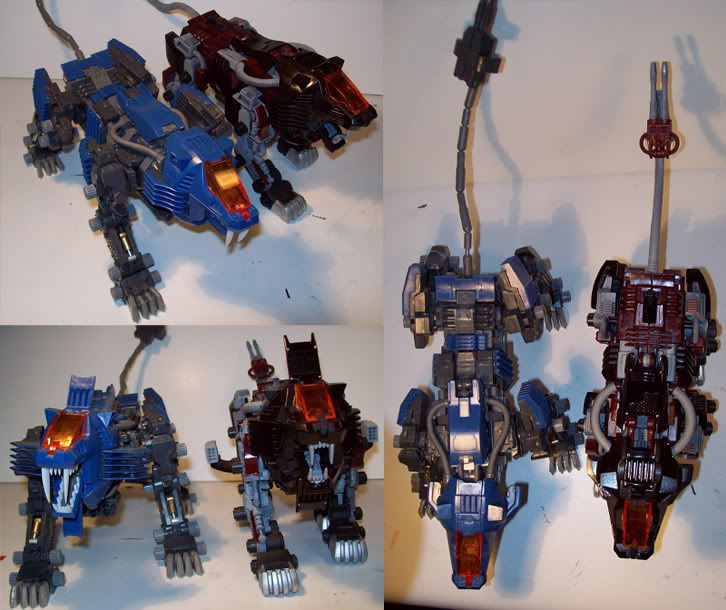
I only have Kronos with me for the regular Shield Liger. As you probably know he has slight modification such as the canopy and how I got rid of his prehistoric fangs. The HMM's missile pods are also out in the front view pic. Shows how he'll just shoot himself with the pods >_>;
Intro
First off I'll say that HMMs are not friendly to beginners in model building and requires a lot of patience. There are a lot of small pieces that easily break or get lost easily. Work on something flat and a solid color, like a card table or something, so everything will be in one spot. Good luck if you drop a piece on carpet. Another major point is to be very careful cutting out the parts. I've found side cutter pliers to be the most effective over scissors or razors. They don't put the strain on the pieces like scissors do and it won't take forever/cut yourself like with the razors. There are a few spots where you might want to super glue to hold it together better too.
So you opened the box...
after admiring the awesome box art, and was greeted with about 33 frames of parts, some springs, a
The manual is split into different sections consisting of the building guide, illustrations/concept art, a color guide, some pretty pictures, and a back story in japanese text that I do not understand (Well ok I understand ゾイド and that's the extent of it). Unlike the regular zoid model manuals, these are printed on regular laser paper with a semi-gloss. Why is this good? Can print nicely in color and prints small detail well.
Naturally my favorite part is the highly detailed concept art (tee-hee)
Let's get building!
The first thing you get to build is the head. Like all the building parts, it helps to thoroughly look over the step you're on first and build it piece by piece rather than cutting out all the pieces you need for that step first. With the head it's not so bad. Just watch out for the teeth cuz they're really... er, pointy. Make sure to do the steps in the thought bubbles first.
Next you move onto the "bust" aka the front end of the torso. Once again nothing too confusing. The thing to watch out here is when you're cutting out the gold pieces. Don't cut the end with the thin hydraulic piece, instead cut the thicker end out first then gently twist out the other end. The thin side is extremely fragile and can't stand the strain of cutting (esp with scissors). The tubing/wire thing that goes around where the back gun is mounted seems to like to pop off so super glue might be need there.
 Fragile thin piece
After the bust comes the waist with some more delicate gold/silver pieces. The part where you have to put on the missile pod arms is a bit tricky. I found it easier to put one of the side parts on first after building the middle section and then sliding the gold pieces into the slider part. Then put the the other end piece on. *trying to pull him apart to take pics to illustrate* Now why don't these things come apart when you want them to!?!

Finally you're on to build the final part of the body, the butt. The things to note here are to be careful when you put together the pieces that the legs attach to. It's marked by a "!" and warns you to pay attention to which is upside. This is important because if you put it on upside down, it won't be able to turn. The other thing to mention is a part that might be in need of some super glue. The piece I took a pic of likes to fall off all the time. It's not apparent until you attach the legs and the added weight makes the whole butt fall off XD;
 Glue area
Once all 3 torso pieces are made the manual tells you to put them together and goes on to build the chest mounted gun and the tail on the same page. Nothing difficult here but just watch which way you put the hoses in on the chest gun.
Next you build the 4 paws. Pay close attention to the angle the rubbery M1 pieces point. Although you can mess around with them and get a Liger Zero claws fanned out / claws all together effect.
And now comes the part where there need to be more steps, the dreaded legs. Seriously. Way to many freakin arrows and pieces for one step. Not to mention anyone with bad eye sight would insta-fail. Yeah I danno what to even say with this part other then look it over a million times before you cut/built anything. The hind legs directions are just as bad. Have fun with that. Oh and those plates that go on top of the paws can be a pain. If you don't put them on perfectly they'll just pop off. If you can't get it just super glue the buggers down.
If you manage all of that, the final step is to put all the pieces together! (Unless you're like me and puts the pieces on once you finish them)
CONGRATULATIONS! You have just
My final thoughts
I have to say at first I wasn't interested in the HMM Shieldy at all, but I think he looks a lot better in person. I can't believe I'm saying this, but I actually like the colors. *GASP!* I didn't have any trouble what so ever building this guy, but of course he's my 4th HMM and after building the Blady (and rebuilding the Blady after painting him) I'm pretty used to building these now. I personally love the HMM line. Probably because I'm heavily into detail and enjoy the more extensive build. The HMMs are also more friendly to me in my incessant need to custom paint models. All the pieces are separate so I don't have to go through all the fuss taping off stuff.
Design gripes/likes:
Heh, well now... I guess I'll start with the head. I still overall hate the head. It's too narrow and totally lost the fluffy-ness that I love in the original Shieldy has in his head. I don't like the nose piece and the first thing I'm modifying is his horrid Aero Liger teeth. But not all is bad about the head. I really like how the side parts of his mane can fold out and I like the canopy design. The only other gripe I have is the missile pods. If you fold them down, they totally don't come out enough and he would always end up shooting himself. I'm thinking about making a swivel part so the pods can face outward instead of aiming straight into his leg.
Overall verdict: Overall I'll go for a regular Shieldy any day over the HMM, but I think it would be interesting to see what the regular Shieldy's head would like on the HMM since it's the only thing that bugs me.


I only have Kronos with me for the regular Shield Liger. As you probably know he has slight modification such as the canopy and how I got rid of his prehistoric fangs. The HMM's missile pods are also out in the front view pic. Shows how he'll just shoot himself with the pods >_>;


